Initial bouncing ball animation. I think it still needs some work on adding some more frames when the ball reaches the 'top' of its bounce, at the moment it seems quite chunky around that area - something to work on for next weeks tutorial.

Friday 30 October 2015
Wednesday 28 October 2015
Life Drawing #4 - Halloween Special

Approx 20 minutes

Assorted 2-3 minute poses

1 minute, 30 second and 20 second poses focusing on fluid movement

Approx 20 minute pose

Photo of final pose
Monday 26 October 2015
Photoshop Tutorial - Stag Beetle/Post Box
In today's tutorial we were focusing on production art and were tasked with creating a form/structure from an object and and animal that we (literally) picked out a hat (box). I got a post box and Stag Beetle, so first step was research - see below my collected reference images.

The second step was to start thumbnailing our ideas, so below are very quick thumbnail sketches of a few designs.
In design #1, I thought the double wing of the beetle was a good feature to use for the 'door' of a free-standing 'English' postbox based structure.
Design #2 is based on the typical 'American style' house mailbox, with the wings being able to be flipped up to show the mailbox has items in it. This is my favourite design.
Design #3 is based off of wall mounted mail boxes some houses have instead of letterboxes through front doors, the inner wings form the basket and the outer wings form the protective case, which open outwards and you reach into the inner basket to retrieve letters, with the antlers for decoration, as with he other designs.
Designs #4 and #5 stem from #3 but are more of a rounded/3D basket design than the more 2D wall mounted one. Both sets of wings open outwards, letting the enclosed letters fall out the bottom to be collected.

Saturday 24 October 2015
Friday 23 October 2015


Invisible Cities: Baucis - Building and Domes Development
I created more building thumbnails/forms, experimenting with the dome shape, using forms I created in Maya to help me, also creating multiple layers for one structure so I could sandwich the plant forms into the dome and have it look like it was an actual bio dome. First I made it with an opaque white back layer, and later had to come back and re-do this to be transparent to appear as glass. I also put slight sheen/shadowing on the front panes to help with this effect. I also created the tall, hexagonal accommodation buildings the inhabitants of Baucis would live in. The windows are close and compact to conserve glass for the bio-domes, as it is not essential for the inhabitants to have large windows. For the dome on top I just duplicated the finished bio dome form and warped the item to make the base concave to fit the perspective. I also created a hexagonal and vine inspired cable cart to layer into my paintings.

In a separate document I collaged natural forms copied from my interior shot into the completed dome form, creating different arrangements sandwiched in between the dome layers to create an assortment of bio-domes to be used in my establishing and low angle exterior shots.


I then copied these dome arrangements into another document and merged the layers, creating a "flat" one layer image so the plants inside would not accidentally get moved when repositioning and resizing the domes. The initial domes I made I made with the opaque white background (left) and when I came to putting some of these into my low angle shot I realised how bad and fake this looked, so had to come back, re make the back layer as mentioned above, transfer this into the above document, then re make dome compositions and go through the same process again. This mistake cost me quite a lot of time and was a big frustration, but I'm glad I took the time to go back and fix the issue as I know if I hadn't my final outcomes would be nowhere near as convincing as they are now. I have put different background colours to show the difference between the opaque and translucent domes.

I then created another document, duplicated my accommodation building into this a few times, then duplicated some of the domes from the above document on top of these, warping the bottom edge to fit perspective. Again I've used different background colours to show the dome transparency.

Once I had flattened all the layers in the above documents, so each dome or building was made of just one layer, it was a simple matter of just duplicating these forms into my establishing and low exterior paintings and re sizing, arranging, flipping, rotating and changing the layers of the forms to create the sense of a "full" city, and give it depth and perspective.
Thursday 22 October 2015
Invisible Cities: Baucis Interior Shot Complete
Interior Shot is finally done! (also my first full digital painting ever) Took me absolutely hours but I'm really quite proud of the result.

Gif of process:

Now to just duplicate some of the trees into the bio-domes of my other two shots to get them finished off.
Invisible Cities: Interior Shot Progress
So... painting leaves/trees turned out to be trickier than I was anticipating. Spent a few hours this morning looking through tutorials, experimenting with different brushes and layers etc, and even downloaded a few new brushes, but I think I've finally found a way of creating masses of leaves that I'm happy with. The birch trees on the left were my first attempt at trees, and the partial branch on the right I'm particularly pleased with.

Close-up of overhanging partial branch - used 5 layers and 3 different brushes

Invisible Cities: Interior Shot Final Plan
I'm so excited about this viewpoint, definitely my favourite of the 3. Here's my finished plan, with all the different plant layers, now to just start filling it all in tomorrow!

Invisible Cities: Establishing Shot Progress
Establishing shot progress so far, I'm determined to get this finished tonight. When I came to adding more buildings and thinking about colour earlier I realised I had made the quite large mistake of putting quite a few elements on the same layer, which simply was not going to work, so had to re- go over a lot of things, but I've learned from it and feel much more confident about this now. Still need to add the buildings and plants, add shine to the dome, plus want to work over the cliffs again to make them more angular, but I'm finally happy with the base shape.

Wednesday 21 October 2015
Invisible Cities: Baucis Shot Developments
Exterior Establishing Shot viewpoint, still need to add in some extra buildings within the dome. I've had a lot of issues with sorting out layers and how to actually put elements together in these compositions because I am still very new when it comes to Photoshop and this doesn't help with the fact that I have a lot of overlapping structures. I think I'll need to go back to this and break the main building up into separate layers to be able to put in buildings, and add the side telescope platforms.

Had similar layering difficulties with this shot. In the end I thought it better to restart, also because I really wasn't happy with the angle, it just looked too flat and small.

This is the remade viewpoint, all layers sorted and just waiting to add in the accommodation buildings at the back then the smaller details like carts, vines and platforms. Also need to add some tree forms within the domes. Will do colour comps of this but already have a good idea of my colour scheme.

My interior is largely based off of this thumbnail I did at the very beginning of the project. The idea of having multiple levels within the domes has really stuck with me.

My accommodation buildings are largely based off of this quick sketch in my book. Will be hexagonal with a dome on top, continuing the theme, and the windows are small but wide to conserve glass for the domes, and the buildings have platforms (some open air, some with domes) as personal gardens to provide as much greenery in the city as possible, and also make use of as much space as possible.

However, I do feel like I'm definitely developing my knowledge and skill in Photoshop, I feel a lot more confident and capable with it than even just a few days ago. Cant wait to start adding the finer details, just need to re-layer a few things and duplicate in some more buildings.
(It's such a good feeling to be actually enjoying set work for once. Even with previous art courses I don't think I've ever really experienced as much enthusiasm as I have with this about learning a new skill before.)
Monday 19 October 2015
Invisible Cities: Modelling Key Elements in Maya
I'm really having some issues with getting the angles and perspective right in my city, as I have a very specific plan for where everything is going as I have decided Baucis was made for a very specific purpose, so the city itself would have been designed in a very thought out way. All main structures have 6 sides, and the platform itself has 12. There are 2 cable carts per main terminus building side, and these reach out to each of the 12 "districts" of the city. So of course, I have to get the angles right or everything just looks ~off~ so I decided when I was sketching it all out to model the large main elements) the platform, legs, main terminus building, city dome) in Maya, to get the angles right, then I can take screenshots and work over the top of these in Photoshop when creating my views, ensuring my perspectives are right, saving me time and from a massive amount of stress.
To start out I modelled the 6 sided main building, with a 6 (5 height, because this looked the best) sided bio-dome on top. I then spent quite a while trying to figure out how to create the curved struts/cable cart beams coming off of this providing transport. In the end I used a quarter of a torus and stretched it to the sizes i needed, then copied and rotated it to all the sides, giving me my 12 struts. The beams arent exactly even all the way along but at this point I was beyond trying to fix this, it doesnt need to be perfect as Im only using it as a rough base for drawing in photoshop.

This is the view from the top, next I needed to rotate the struts on each face so they would fit the 12 sided city platform how I had planned.

To help me achieve this I added in the base platform, at the approximate size I wanted for my city, and rotated each beam so there was one per 12th, rotating the longer beams 30 degrees and the smaller -15 degrees to line up in the centre of each "district".

This is the view from the side. Views of the model like this would be good bases for an outline for my establishing shot.


Next I created the city's dome - this is needed to protect the city from the outside hostile and polluted environment, providing a safe atmosphere for the inhabitants to live and plants to grow, the dome also creates water through condensation.


More viewpoints.

Establishing viewpoint in mesh mode to see through dome to building positioning.

Exterior low angle shot viewpoint in mesh mode to show dome structure that would also be visible.

Invisible Cities: Further Development and Viewpoint Planning

Above on the left is my ~final~ city plan, with the struts and canal placement sorted. Below I've quickly gone over with some colour coding so its easier to see what's what.
Green - The city legs (obviously below the platform not to the sides. but like this to show the placement on each corner angle)
Yellow - The city platform.
Blue - Canal System, these drain away into a large reservoir in the city platform below the terminus building - water treatment plants here etc.
Black - Main terminus building. (is a little too large here)
Red - Cable cart struts
Red - Cable cart struts

Some quick thumbnails for the establishing and exterior low angle shots with this city plan put into action. However, I'm having some difficulty getting the angles and perspectives right because of all the geometry involved in my city - modelling in Maya could be the way to go.

Sunday 18 October 2015
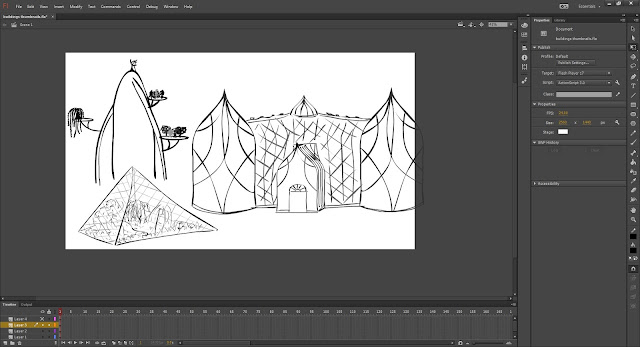
Invisible Cities: Baucis Building Development
These were my initial building thumbnails, I'm not all that proud of them: I wasnt really sure where I was going with them plus I really wasn't getting on with drawing in photoshop.

However, 3 of them gave me a strong base with which to develop: top left the telescope silhouette, top right the bio-domes and bottom 2nd from the left I really liked the idea of a building with multiple platforms/struts coming off - which was my main inspiration for more complicated building developments.
I decided to keep developign in my sketchbook to actually just get some work down.


I was having some issues transferring them over to Photoshop however and was worrying for a few days about developing city concept thumbnails in Photoshop because of my slight aversion to the program, and how time consuming it was not drawing in flash, but then trying to erase the white background that came with the image once I moved it from flash to Photoshop. However I had a short 1 to 1 with Jordan and he showed me some good tips on how to make drawing in Photoshop a little easier for myself, and also a way of importing just the line work from flash by exporting as a .PNG image (to have transparent backgrounds) so I could then go back into these images and add colour behind the line work to bring the building to life a little/give it tone.
Below, the buildings on the bottom I didn't use the export method for, and had already spent some considerable time cropping out the background, and would still have to go back in and take out all the white within the building, but top right I exported and was left with just lines. 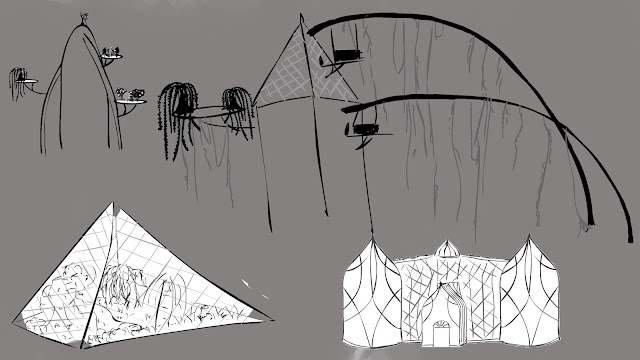

This building idea in particular stuck with me: it got me thinking about transport around the city, and we then kept being reminded by various tutors to think about the WHYs and HOWs of our city.

I made some more planning pages in my sketch book, decided to go with a "nuclear fallout" idea stemming from from Phill's OGR feedback.


I was also having a hard time trying to visualise how my city would go together, decided it was time for another aerial plan of the city, which would in turn once I had figured out what would go where and why, would help me put together thumbnail compositions for each shot.
Decided my city was built for a reason so would have all things worked out, specifics, be as "green" as possible.


Entire city has dome around it - protect from outside radiation and pollution. Therefore need to generate own water and air - from Steven OGR feedback, - sun beating down on dome uses condensation and warmth for most of dome. platform is slightly dipped in the middle, canals around edges of dome collect condensation water and flow it into the centre of the city. from all directions - have different city districts. rivers flowing in provide transport and water to the city, once in centre use main terminus building to get back out again, cable carts use gravity to get out and down. Also have vines along cable cart struts - provide large amount of co2 to o2 all around city - air for all. some can have fruits growing for food. There are still domes - provide mini environments for different reasons, in different districts, city layout is thought out, controlled. some environments for warmer/cooler climate specialised plants, some are intensive food growing, bioengineering etc. some are waste management eg compost for fertiliser for areas. Entire platform based on honeycomb structure, all flows, strong, but also easier shapes to build than circular, all buildings etc have 6 or 12 sides.
To develop from this I want to model the main terminus building in Maya so I can get a better idea of how it would look 3D so I can draw it properly in Photoshop for developing more thumbnails. Also I think modelling a simple entire city structure with the legs and dome over the entire thing would be a good idea.
Subscribe to:
Posts (Atom)